

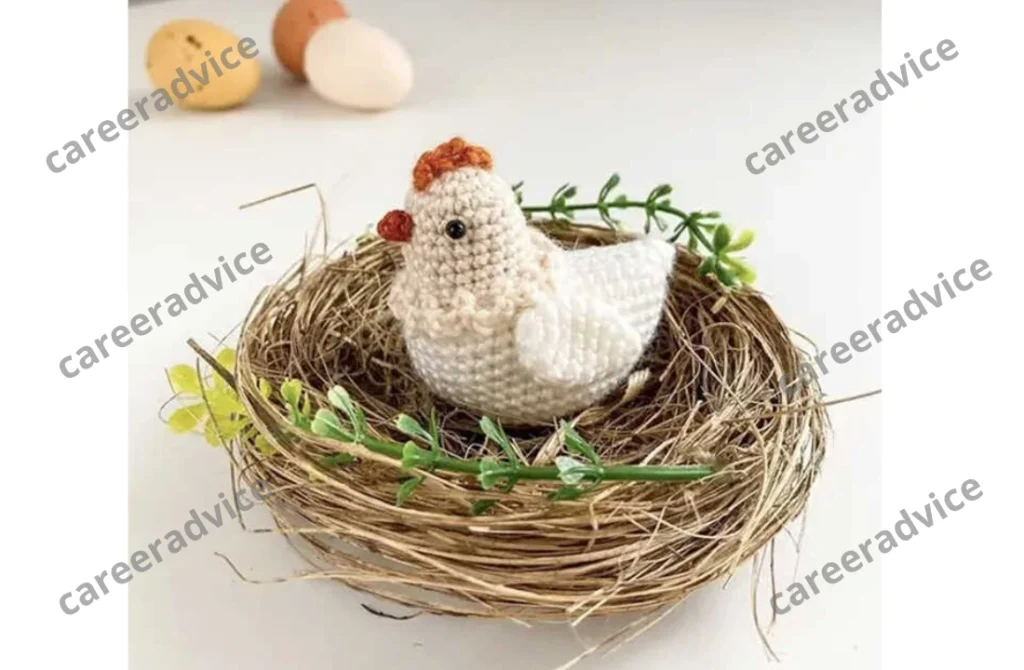
Free Amigurumi Chicken Pattern
Head-body (one piece)
Start with beige yarn:
R 1: 6 sc in mc (6)
R 2: (inc) * 6 (12)
R 3: (1 sc, inc) * 6 (18)
R 4-5: 18 sc (2 rows)
R 6: (5 sc, inc) * 3 (21)
R 7-8: 21 sc (2 rows)
R 9: (6 sc, inc) * 3 (24)
Change to white yarn. Don’t cut off the beige yarn, leave it in front of the work.
R 10: BLO: 24 sc
R 11: make 7 ch, work along the chain starting from the 2nd chain from hook: inc, 5 sc, then continue working 24 sc around on the body, next 6 sc along the opposite side of chain (37)
Place stitch marker. It will be the beginning of the new row.
R 12: 2 inc, 16 sc, 2 inc, 16 sc, inc (42)
R 13: 1 sc, 3 dc bobble stitch (3 dc with one top in one stitch), 40 sc (42)
Return to the beige yarn:
Work with beige yarn in front loops of 10th row.
R 10 (FLO): (4 ch, skip one st, 1 sc in the next st) – repeat to end of row.
Finish with sl st. Cut off the thread, weave in.
Continue with white yarn:
R 14-17: 42 sc (4 rows)
R 18: 1 sc, dec, 19 sc, dec, 18 sc (40)
R 19: (dec, 18 sc) * 2 (38)
R 20: (dec, 17 sc) * 2 (36)
R 21: (4 sc, dec) * 6 (30)
R 22: (3 sc, dec) * 6 (24)
Stuff with fiberfill.
R 23: (dec) * 12 (12)
Finish stuffing.
R 24: (dec) * 6 (6)
Tighten stitches with a needle. Cut and weave in the thread.
Wings (make 2)
With white yarn:
R 1: 6 sc in mc (6)
R 2: (inc) * 6 (12)
R 3-5: 12 sc (3 rows)
R 6: (4 sc, dec) * 2 (10)
R 7: (3 sc, dec) * 2 (8)
R 8: (2 sc, dec) * 2 (6)
Tighten stitches with a needle. Leave a thread end for sewing. Bring it to the middle of the inside part of the wing.
Beak
With orange yarn:
R 1: 4 sc in mc (4)
R 2: (1 sc, inc) * 2 (8)
Do not stuff. Leave a thread end for sewing.
Assembly
- Glue eyes between rows 4 and 5, with 7 sc between them.
- Sew on the beak across rows 5 and 6 between the eyes.
- For the comb:
- Insert hook under a stitch from the 2nd row (near the back), attach orange yarn.
- Make 3 ch, 1 sc under next stitch (from 1st row).
- Repeat: 3 ch, 1 sc under next stitch (1st row), 2 ch, 1 sc under a stitch from 2nd row.
- Cut, secure, and weave in the yarn.
- Sew the wings to the body sides, roughly rows 7–13 from the bottom.
If you share your finished project made from my pattern on social media, tag me @scandistyle_dolls and use hashtag #by_scandidolls.