A creative blog filled with crochet patterns, beginner-friendly tutorials, and a handful of delicious recipes.

Materials
Yarn
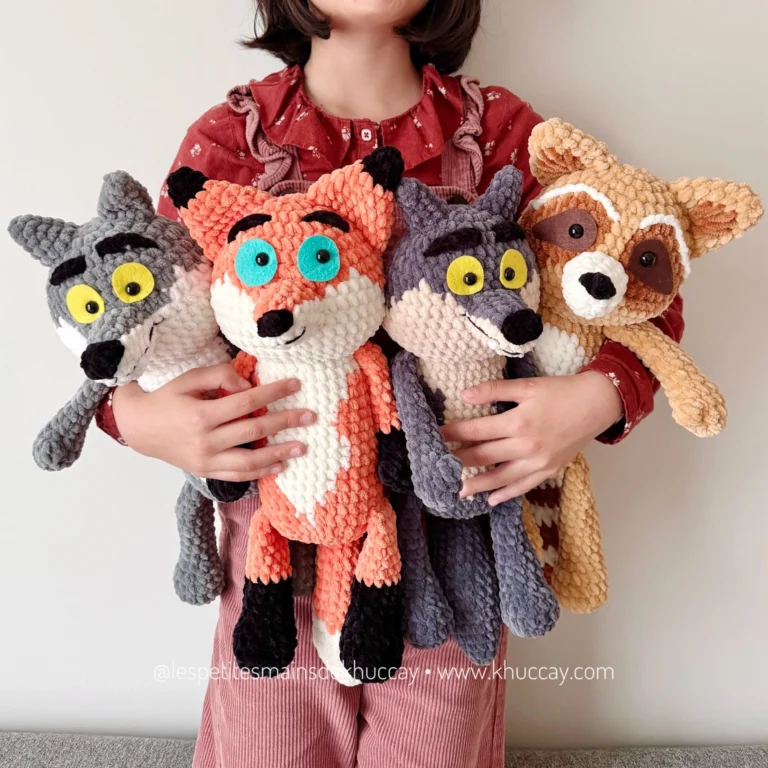
- YarnArt DOLCE (100 g / 120 m) – Color 762 Brown (2 skeins)
- You may use any velvet yarn of similar weight and in any color
Additional Materials
- Sew-on eyes, 10 mm
- Felt circles, 12 mm
- Safety nose, 18–15 mm
- Fiberfill (hollow fiber recommended)
- Crochet hook 3.0 mm (US D)
- 35 mm disc and cotter pin
- Strong thread for thread jointing
- Long needle for jointing
- Scissors
Abbreviations (US Terms)
- MR – magic ring
- SC – single crochet
- SL ST – slip stitch
- CH – chain
- INC – increase (2 stitches in one stitch)
- DEC – decrease (2 stitches together)
- (…)*X – repeat instructions X times
- (…) – total stitches in the round
- Shift stitches – additional stitches to keep marker aligned
Arms (Make 2)
Stuff as you go.
Rnd 1: 6 sc in MR
Rnd 2: 6 inc (12)
Rnd 3: (1 sc, 1 inc) ×6 (18)
Rnd 4–6: 18 sc (3 rounds)
Rnd 7: 2 dec, 14 sc (16)
Rnd 8: 2 dec, 12 sc (14)
Arm Bending Shape
From this point, alternate decreases and increases.
Rnd 9–15: 3 sc, 1 dec, 5 sc, 1 inc, 3 sc (14) – repeat for 7 rounds
Rnd 16: 7 sc, do not finish the round
Rnd 17: 7 dec (7)
Pull the opening closed, fasten off, and weave in the tail.
Legs (Make 2)
Stuff as you go.
Rnd 1: Ch 5. From 2nd ch: inc, 2 sc, 3 sc in last ch, 3 sc (10)
Rnd 2: 2 inc, 2 sc, 3 inc, 2 sc, 1 inc (16)
Rnd 3: (inc, sc) ×2, 2 sc, (inc, sc) ×3, 2 sc, inc, sc (22)
Rnd 4: (inc, 2 sc) ×2, 2 sc, (inc, 2 sc) ×3, 2 sc, inc, 2 sc (28)
Rnd 5–6: 28 sc (2 rounds) + 3 sc to center the marker
Rnd 7: 8 sc, 6 dec, 8 sc (22)
Rnd 8: 5 sc, 6 dec, 5 sc (16)
Rnd 9–18: 16 sc (10 rounds) – stuff firmly
Rnd 19: 8 dec (8)
Pull closed, fasten off, and weave in ends.
Head
Stuff very firmly as you go.
Rnd 1: 6 sc in MR
Rnd 2: 6 inc (12)
Rnd 3: (1 sc, inc) ×6 (18)
Rnd 4: (2 sc, inc) ×6 (24)
Rnd 5: (3 sc, inc) ×6 (30)
Rnd 6: (4 sc, inc) ×6 (36)
Rnd 7: (5 sc, inc) ×6 (42)
Rnd 8: (6 sc, inc) ×6 (48)
Rnd 9: (7 sc, inc) ×6 (54)
Rnd 10–17: 54 sc (8 rounds)
Rnd 18: (7 sc, dec) ×6 (48)
Insert disc with cotter pin into MR and stuff.
Rnd 19: (6 sc, dec) ×6 (42)
Rnd 20: (5 sc, dec) ×6 (36)
Rnd 21: (4 sc, dec) ×6 (30)
Rnd 22: (3 sc, dec) ×6 (24)
Rnd 23: (2 sc, dec) ×6 (18)
Rnd 24: (1 sc, dec) ×6 (12)
Rnd 25: 6 dec
Pull closed, fasten off, and weave in.
Body
Stuff firmly, especially the neck and belly.
Rnd 1: 6 sc in MR
Rnd 2: 6 inc (12)
Rnd 3: (1 sc, inc) ×6 (18)
Rnd 4: (2 sc, inc) ×6 (24)
Rnd 5: 24 sc in back loops only
Rnd 6: 24 sc
Insert cotter pin fitting tightly in the neck.
Rnd 7: (3 sc, inc) ×6 (30)
Rnd 8–9: 30 sc
Rnd 10: (4 sc, inc) ×6 (36)
Rnd 11: 36 sc
Attach Head
Insert cotter pin ends from the head and secure.
Rnd 12: (5 sc, inc) ×6 (42)
Rnd 13: 42 sc
Rnd 14: 18 sc, (inc, sc) ×3, 18 sc (45)
Rnd 15: 45 sc
Rnd 16: 18 sc, (inc, 3 sc) ×2, inc, 18 sc (48)
Rnd 17–20: 48 sc (4 rounds)
Rnd 21: 18 sc, (dec, 3 sc) ×2, dec, 18 sc (45)
Rnd 22: 18 sc, (dec, sc) ×3, 18 sc (42)
Rnd 23: (5 sc, dec) ×6 (36)
Rnd 24: (4 sc, dec) ×6 (30)
Rnd 25: (3 sc, dec) ×6 (24)
Rnd 26: (2 sc, dec) ×6 (18)
Rnd 27: (1 sc, dec) ×6 (12)
Rnd 28: 6 dec
Fasten off and weave in ends.
Ears (Make 2)
Rnd 1: 6 sc in MR
Rnd 2: 6 inc (12)
Rnd 3: (1 sc, inc) ×6 (18)
Rnd 4–5: 18 sc
Cut yarn.
Muzzle
Rnd 1: Ch 4. From 2nd ch: inc, sc, 3 sc in first ch, 2 sc (8)
Rnd 2: 2 inc, sc, 3 inc, sc, inc (14)
Rnd 3: (inc, sc) ×2, sc, (inc, sc) ×3, sc, inc, sc (20)
Rnd 4: (inc, 2 sc) ×2, sc, (inc, 2 sc) ×3, sc, inc, 2 sc (26)
Rnd 5: 26 sc
Rnd 6: 16 sc – do not finish the round
Cut yarn. Step back 2 rounds and attach the nose in the center.
Tail
Rnd 1: 6 sc in MR
Rnd 2: 6 inc (12)
Rnd 3: (1 sc, inc) ×6 (18)
Rnd 4–5: 18 sc
Rnd 6: (7 sc, dec) ×2 (16)
Cut yarn.
Assembly & Details
- Pin the muzzle between rounds 15–22, 5 rounds below center
- Pin ears symmetrically
- Sew muzzle after light stuffing
- Optional needle sculpting for a snub nose shape
Eyes & Facial Details
- Eyes are placed on round 15, 8 stitches apart
- Sew eyes slightly inward using a tightening technique
- Embroider eyebrows
Thread Jointing (Arms & Legs)
- Attach arms between rounds 7–8
- Ensure belly faces forward and arms are symmetrical
- Use strong thread and repeat jointing passes 3 times
- Attach legs 7 rounds from the bottom
- Check balance: toy should sit upright without leaning
Sew tail lightly stuffed so it doesn’t interfere with sitting.