A creative blog filled with crochet patterns, beginner-friendly tutorials, and a handful of delicious recipes.
Free Crochet Master Class: Unicorn
Design by @madamgurumii
Translation by Anna Safvat
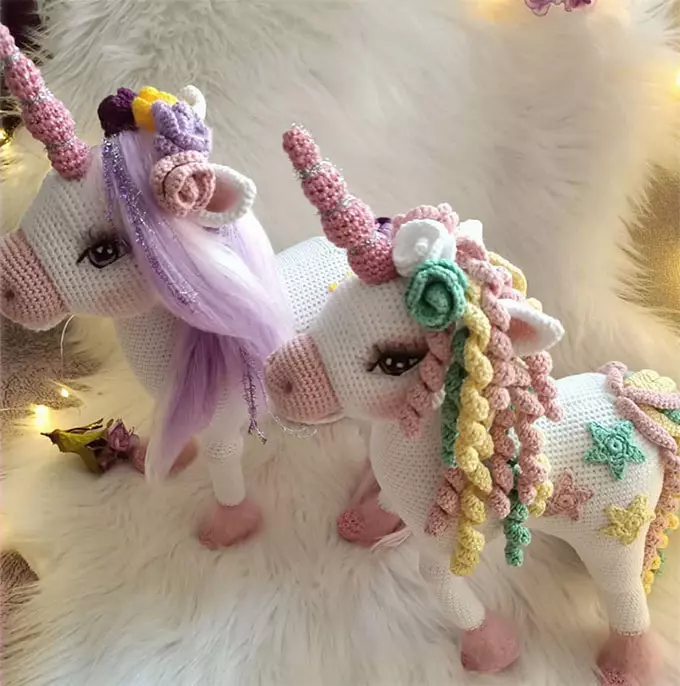
Using this pattern, you can crochet a beautiful four-legged unicorn in the amigurumi technique. Any yarn is suitable, but the author recommends Peria Cotton, Gazzal Cotton, Lanoso Simsim, or similar alternatives.
You can decorate your unicorn with crocheted flowers and stars, which are also included in this tutorial.
The mane can be crocheted or made from doll hair, kanekalon, or felting wool.
Materials & Tools
Yarn
- Peria Cotton
- 13 White — 3 skeins
- 03 Yellow — 1 skein
- 20 Mint — 1 skein
- Gazzal Cotton
- 3444 Pink — 1 skein
- Lanoso Simsim (with lurex)
- 933 Pink — 1 skein
- Nako Paris
- 5408 Pink — 1 skein
- Kartopu Baby One
- 019 Lilac — 1 skein
- 782 Pink — 1 skein
Other Supplies
- Crochet hook (appropriate for your yarn)
- Safety eyes
- Toy stuffing (fiberfill)
- Dry pastel or blush
- Tapestry needle
- Scissors
All materials can be purchased online.
Crochet Abbreviations
- MR – Magic ring
- ch – Chain
- sl st – Slip stitch
- sc – Single crochet
- dc – Double crochet
- inc – Increase
- dec – Decrease
- (…) × n – Repeat n times
Amigurumi Unicorn Crochet Pattern
General Notes
- Always keep track of your stitch marker
- Carefully follow the row count and stitch numbers
- Pay close attention to the final row of each leg — mistakes here will cause incorrect leg placement on the body
Legs (4 Pieces)
Use two yarn colors. Start with Color A.
- Ch 10, starting from 2nd ch from hook
- inc, 6 sc, 3 sc in one stitch, 7 sc (18)
- 2 inc, 6 sc, 3 inc, 7 sc, inc (25)
- In front loops only: 10 sc, 6 inc, 9 sc (32)
- 32 sc
- Attach Color B without cutting A:
- (B: 10 sc) (A: 12 sc) (B: 10 sc)
- (B: 10 sc) (A: 6 dec) (B: 10 sc) (26)
- (B: 10 sc) (A: 6 sc with one top) (B: 10 sc) (21)
- 21 sc (cut yarn A)
- 21 sc
- 5 sc, dec, 3 sc, dec, 3 sc, dec, 4 sc (18)
12–14. 18 sc

Switch to White Yarn
Front Legs
1–15. 18 sc
- (2 sc, inc) × 6 (24)
17–19. 24 sc - (2 sc, dec) × 6 (18)
21–23. 18 sc - 5 sc, 3 inc, 8 sc, 2 inc (23)
- 20 sc, inc, 2 sc (24)
- 6 sc, inc, 3 sc, inc, 10 sc, inc, 2 sc (27)
- 7 sc, inc, 4 sc, inc, 11 sc, inc, 2 sc (30)
- 8 sc, inc, 2 sc, inc, 2 sc, inc, 12 sc, inc, 2 sc (34)
Back Legs
1–23. Repeat rows 1–23 of front legs
- 2 sc, 3 inc, 7 sc, 2 inc, 4 sc (23)
- 18 sc, inc, 4 sc (24)
- 3 sc, inc, 3 sc, inc, 11 sc, inc, 4 sc (27)
- 4 sc, inc, 4 sc, inc, 12 sc, inc, 4 sc (30)
- 5 sc, inc, 2 sc, inc, 2 sc, inc, 13 sc, inc, 4 sc (34)
- 15 sc — begin joining
Left Back Leg (Shaping)
Work 12 rows of 18 sc with white yarn:
- 12 sc, 3 inc, 3 sc (21)
- 21 sc
- 3 sc, 3 inc, 9 sc, inc, 5 sc (25)
- 25 sc
- 6 sc, inc, 12 sc, inc, 5 sc (27)
- 27 sc
- 7 sc, inc, 13 sc, inc, 5 sc (29)
- 29 sc
- 8 sc, inc, 14 sc, inc, 5 sc (31)
- 31 sc
- 9 sc, inc, 15 sc, inc, 5 sc (33)
- 33 sc
- 10 sc, inc, 16 sc, inc, 5 sc (35)
- 35 sc
- 11 sc, inc, 17 sc, inc, 5 sc (37)
Lower Body Panel
- Ch 12, from 2nd ch: 10 sc
2–36. 10 sc in rows, turning with 1 chain at the end of each row
Joining the Legs & Body
After row 27 of the back leg, continue crocheting along the lower body panel, attaching each leg in sequence as described in the pattern (back legs first, then front legs).
Slip stitch inside the first joined leg and place a new body marker.
Body
(The body section is very large and technical. It is translated stitch-for-stitch below to preserve accuracy.)
Rows 1–27:
Follow the pattern exactly as written, including all increases, decreases, and marker placements.
⚠️ Important: Some rows may look incorrect — do not adjust stitches, crochet strictly according to the instructions.
After finishing the body:
- Leave a long tail for sewing
- Stuff the legs firmly but evenly
Neck & Head Attachment
- Crochet 5 rows of the remaining 30 sc at the neck
- Make decreases over the next 2 rows
- Stuff carefully
- When sewing the head, start from the first row and gradually move down 3 rows at the back of the head
- Stuff as you sew
Muzzle (Pink Yarn)
- Ch 10, from 2nd ch: inc, 6 sc, 3 sc in one stitch, 7 sc (18), sl st
- Ch 1, 2 inc, 6 sc, 4 inc, 5 sc, 2 inc (27)
- Patterned increases to 35 stitches
4–5. 35 sc - 10 sc, inc, 24 sc (36)
7–11. 36 sc
Fasten off, leave a long tail for sewing.
Lower Jaw (White Yarn)
- 6 sc
- 6 inc (12)
- (1 sc, inc) × 6 (18)
- (2 sc, inc) × 6 (24)
5–8. 24 sc, fold in half, crochet 12 sc through both layers
Attach jaw to muzzle, then sew both to the head.
Head
- 6 sc in MR
- inc × 6 (12)
- (1 sc, inc) × 6 (18)
- (2 sc, inc) × 6 (24)
- (3 sc, inc) × 6 (30)
- (4 sc, inc) × 6 (36)
- (5 sc, inc) × 6 (42)
- (6 sc, inc) × 6 (48)
- (7 sc, inc) × 6 (54)
- (8 sc, inc) × 6 (60)
11–17. 60 sc - Increase to 72 stitches
19–21. 72 sc
22–36. Gradual decreases as written until closed
Ears (2 Pieces)
Crochet according to the pattern, increasing to 30 stitches, then decreasing slightly.
Leave yarn for sewing.
Long Horn
Worked in sections with alternating increases and decreases to create a spiral texture.
Finish with stuffing and leave yarn for sewing.
Star Decoration
- 10 sc in MR
- Pull tight
- Create 5 chain-based rays, attaching each with a slip stitch
Flowers & Spirals
- Crochet flowers following the provided diagram
- You can change flower size by adding repeats
- Example shown: 9 petals


Spirals
- Use dc or 3 dc per stitch for tighter curls
- Make 3 spirals in different colors
- Adjust length freely (e.g. 75–80 chains)
Mane & Tail
- Crochet 60 chains for the mane
- Use the same stitch pattern as the tail
- Leave at least 5 rows between the horn and mane
- You may leave space between color layers

Face Details
- Eyes can be safety eyes, embroidered, glued, or painted
- Eyelashes may be sewn or glued
- Shape nostrils using yarn the color of the muzzle
- Tint nostrils lightly with dry pastel if desired
Alternative Mane & Tail
Instead of crocheted spirals:
- Cut yarn strands
- Attach using the latch method
- Brush with a comb for a hair-like effect
You can wrap the horn with sparkly yarn for extra shine